You can think of texturing as a simple type of compositing, and the first thing you need to understand when creating composite images is Blend Modes. If you google “Blend Modes in Photoshop” you’re going to get a lot of technical tutorials that may be hard to understand. To simplify things, we made what we are calling “the Ultimate Visual Guide” to help you understand the basics of Blend Modes so you can quickly be on your way to creating great composite images with textures.
The Photoshop Paper Texture Pack includes 230 handmade high-resolution textures designed to take your photography to the next level. To create the Photoshop textures we started with basic craft papers and physically crumpled them, scratched them, tore them, and even lit them on fire them to create unique and interesting textures which we then digitized into 20+ megapixel high-resolution files. Watch the video or read the article below to see what’s included in the Texture Pack Collection.
Note: While the SLR Lounge premium membership includes the exercise file(s) pertaining each particular tutorial in the Texture Pack, it does NOT include full download to the Texture Pack. This addon can be purchased in our store here.
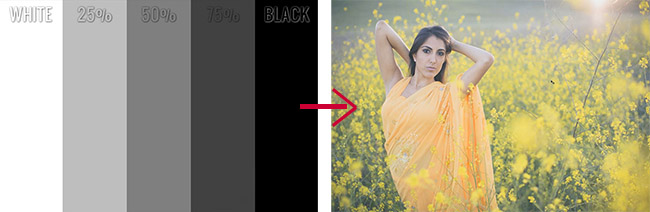
Texturing is a simple composite where we take a texture image, place it over a photo and blend them together to make a composite image. To demonstrate, we have a WtB (White to Black) test image with White, 25% Grey, 50% Grey, 75% Grey, and Black which we will layer over our photo so we can show you exactly how the different Photoshop Blend Modes work in practice.
When we choose a Photoshop Blend Mode, we are essentially asking Photoshop to blend our selected layer with the layer below based on whatever Blend Mode is selected. So essentially, depending on the mode, pixels from the top layer are going to alter the color and luminosity of those on underlying layers. This will make more sense as we continue with our demonstrations.
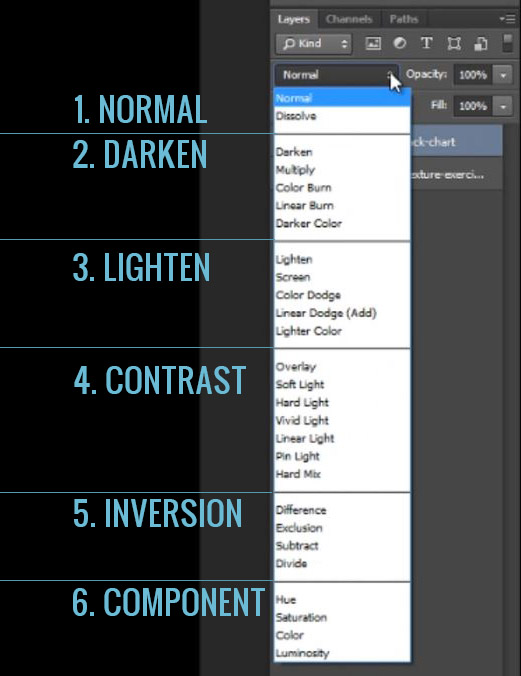
Right now, lets take a look at the available Photoshop Blend Modes, which are located in the “Layers” tab in Photoshop as you can see in the image below. When you first look at the blend options you might be overwhelmed by the choices, but they’re actually split up into 6 easy groups. Each of these groups have Blend Modes that operate similarly in function which we will discuss in depth below. If you want to alternate between the different Blend Modes you can press “Shift +” or “Shift -” to cycle through them quickly.
At 100% Opacity the default “Normal” Blend Mode simply shows the image on top, and we can’t see anything underneath it. When we drag the Opacity down to 50% it makes the selected layer more transparent and this allows us to see the image below it as you can see below.
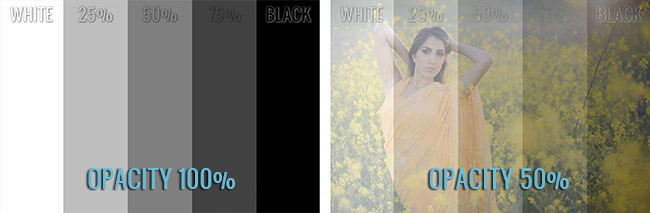
However, the Normal Blend Mode isn’t actually “blending” the two layers together, it’s simply making the selected layer more transparent which in turn reveals the layers below. But, even though it isn’t technically “blending” pixels, it is still a very effective tool when making composite images. So, when we drop our opacity on the White to Black layer down to 50%, we can still see all of the tones, we simply see them at 50% opacity.